
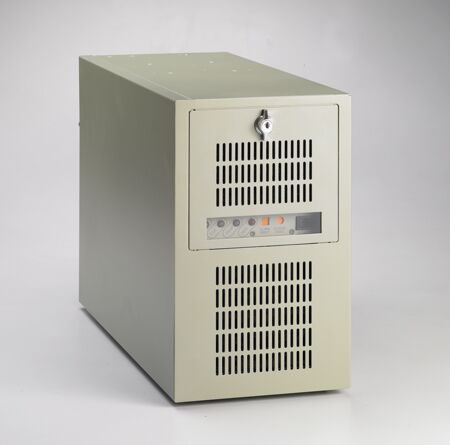
Advantech Quiet Desktop/Wallmount Chassis Ready for ATX Motherboard
IPC-7220Starting at $470.00
Main Features:
- Quiet version provides low-noise solution
- Shock-resistant drive bay designed to hold two 5.25" and two 3.5" disk drives (one front-accessible & one internal)
- Lockable front door prevents unauthorized access
- LED indicators for fault detection and alarm notification
- Easy-to-maintain air filters
- Optional 300W, 400W redundant power supply

Frequently Asked Questions
The front panel has two USB ports and one PS/2 port. The rear panel has two D-SUB 9-pin openings.
The IPC-7220 supports several ATX power supply modules: a 300W ATX power supply with PFC (PS-300ATX-ZB), a 300W ATX redundant power supply (RPS-300ATX-Z), a 400W ATX power supply (PS-400ATX-ZB), a 400W ATX redundant power supply (RPS-400ATX-Z), and a 300W ATX DC power supply (PS-300ATX-DC48) for -32 to -72 Vdc input.
Operating temperature is 0 to 40°C (32 to 104°F), and non-operating storage temperature is -20 to 60°C (-4 to 140°F). The chassis is CE compliant and UL/cUL listed.
The chassis provides two 3.5" bays (one front accessible and one internal) and two 5.25" bays. This allows for one front-accessible FDD, one internal 3.5" HDD, and additional 5.25" drives.
The chassis supports up to five PCI and two ISA full-length cards, and can accept up to seven plug-in cards in total.
Yes. The chassis can be placed on a desktop or mounted bi-directionally using the supplied brackets. It can be bottom-mounted or right-mounted onto surfaces such as walls or workbenches.
The chassis measures 200 mm (W) x 320 mm (H) x 480 mm (D) (6.8" x 12.4" x 18.9") and weighs 11.5 Kg (25.3 lb) with the PS-300ATX-ZB power supply installed.
The IPC-7220 has four LEDs: PWR (system power), FAN (cooling fan status), TEMP (in-chassis temperature), and HDD (hard drive activity). Green/orange indicates normal status; red indicates an abnormal condition (except HDD, where red indicates data access and no light means idle).
Yes. The IPC-7220BP is an extension model of the IPC-7220 that supports an 8-slot backplane, with several passive backplane options available (e.g., PCA-6108E-0C1, PCA-6108P4-C, PCA-6108P6-0B3, PCA-6108P6X-0A1, PCA-6108P8-0A1).
How-to Guides
- Remove the three screws mounting the power supply bracket to the chassis, then lift the power supply bracket.
- From inside the chassis, attach the motherboard I/O shield to the rear plate of the chassis.
- Fix the motherboard in the chassis with screws.
- Plug in the 20-pin ATX power connector and +12V power connector from the power supply, and connect the 9-pin USB and 5 or 6-pin PS/2 connectors from the front panel.
- Return the power supply bracket and fasten it with screws.
Note: Use a CPU cooler lower than 70 mm to avoid interference and ensure adequate airflow.
- Remove the four outer screws mounting the drive bay to the chassis, then take out the drive bay.
- Remove the drive bay covers. Insert the drive into the proper location and fix it with four screws.
- Repeat for additional drives if needed.
- Connect a 34-pin flat cable from the motherboard to a FDD/slim-CD-ROM, a 40-pin flat cable to an IDE HDD, or a SATA cable to a SATA HDD. Insert the proper power connector into each drive.
- Slide the drive bay back into the chassis and screw it in place.
- Remove the two screws mounting the hold-down clamp to the chassis, then take out the hold-down clamp.
- Locate the slot to be used and remove the corresponding blank bracket from the rear plate.
- Insert the plug-in card, ensuring the card bracket is seated properly and the other edge is fixed in the guide rail. Fasten the card at the top of the bracket with a screw.
- Repeat for additional cards.
- Insert rubber buffers into the hold-down clamp (one row for PCI cards, one row for ISA cards) to cushion the cards from shock and vibration.
- Return the hold-down clamp and fasten it with screws.
- Attach the IPC-7220 to two mounting brackets, positioned at the bottom or right side of the chassis.
- Use these brackets to mount the chassis onto a wall, panel, work bench, or underneath/on top of a desk or table.
- Unplug the AC inlet from the power supply.
- Remove the cover of the IPC-7220.
- Remove the three screws mounting the power supply bracket, then lift the bracket.
- Unplug the ATX power connector, +12V power connector, floppy drive power connector, and peripheral power connector(s) from the drives.
- Remove the four screws mounting the power supply to the bracket and take out the power supply.
- Place the new power supply into the bracket and fasten it with four screws.
- Reconnect the ATX power connector, +12V connector, floppy power connector, and peripheral power connectors.
- Return the power supply bracket and fasten it.
- Replace the chassis cover and plug in the AC inlet.
| Manufacturer | Advantech |
|---|---|
| Humidity | 10 ~ 85% @ 40°C, non-condensing |
| Operating Temperature | 0°C ~ 40°C (32°F ~ 104°F |
| Storage Temperature | 10 ~ 95% @ 40° C, non-condensing |
| Shock | 10 G (with 11 ms duration, half sine wav |
| Weight | 14 kg (30.8 lb) |
| Dimension | 200mm x 320mm x 480 mm (7.9" x 12.6" x 18.9") |