
Nuvo-9501 Series: Intel 14th/13th/12th-Gen Core Compact Fanless Computer with 2x 2.5GbE and 4x USB 3.2
Nuvo-9501 SeriesStarting at $1,165.00
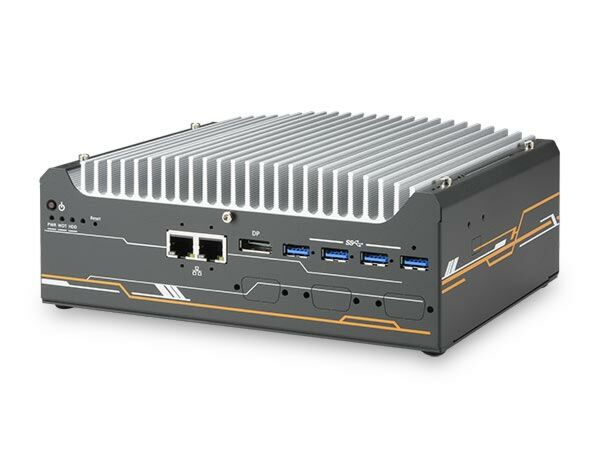
- Intel 14th/13th/12th-Gen Core 35W/65W LGA1700 CPU
- Compact 212 x 165 x 80 mm footprint
- Rugged, -25°C to 60°C fanless operation (Nuvo-9505D only)
- Up to 32GB DDR4 3200 SODIMM
- 2x 2.5GbE and 4x USB3.2 Gen 1 with screw-lock
- Supports 1x M.2 2280 Gen4 x4 NVMe and 1x 3.5”/2.5” SATA HDD/SSD storage
- 4-CH isolated DI and 4-CH isolated DO (Nuvo-9505D only)
- VGA + DP dual display outputs

Frequently Asked Questions
The system provides the following I/O:
- 2x 2.5GBASE-T Ethernet ports (Intel I226-V on Nuvo-9501, I226-IT on Nuvo-9505D)
- 4x USB 3.2 Gen1 (5 Gbps) ports and 2x USB 2.0 ports
- 1x VGA output (up to 1920 x 1200) and 1x DisplayPort (up to 4096 x 2304)
- 1x software-programmable RS-232/422/485 port (COM1) and 3x 3-wire RS-232 ports or 1x RS-422/485 port (COM2/3/4)
- 1x 3.5 mm 4-pole microphone-in/speaker-out jack
The Nuvo-9505D variant additionally provides an isolated 4-channel digital input and 4-channel digital output port via a DB15 connector.
The system accepts 8 to 35V DC input via a 3-pin pluggable terminal block with remote on/off control support. Measured maximum power consumption examples include: i7-12700 (65W mode) 141.4W @ 24V, i7-12700TE (35W mode) 106.6W @ 24V, i5-12400 (35W mode) 105.1W @ 24V, and i5-12400 (65W mode) 120.5W @ 24V.
The Nuvo-9501 operating temperature is -10°C to 60°C (with 35W or 65W CPU; a fan kit is recommended for 65W CPUs and ambient above 50°C). The Nuvo-9505D operates from -25°C to 60°C. Storage temperature for both is -40°C to 85°C. Sub-zero operation requires a wide-temperature HDD or SSD. Humidity tolerance is 10%-90% non-condensing. The system is rated for CE/FCC Class A per EN 55032 and EN 55035, and tested for vibration (MIL-STD-810H Method 514.8, Category 4) and shock (MIL-STD-810H Method 516.8, Procedure I).
The system has one 260-pin SO-DIMM slot supporting up to 32GB non-ECC DDR4-3200 memory. For storage, it has a Gen4 x4 M.2 2280 M-key slot for NVMe SSDs, and a SATA port that supports either a 2.5" HDD/SSD or a 3.5" HDD (only one can be installed at a time due to space constraints).
The system offers two full-size mini-PCIe sockets with internal SIM sockets for 4G/3G wireless modules, and one M.2 2230 E-key socket for WiFi 5/6 or Google Edge TPU modules. SMA antenna apertures are located on the side panel for external antenna connection.
Neousys has tested Microsoft Windows 10 LTSC 2021 (x64) and Ubuntu 20.04.5 LTS, 22.04 LTS, 22.04.1 LTS, or other Linux distributions with kernel version 5.15 or later. On Linux, users may need to manually compile and install drivers for the Intel graphics or I226 GbE controller if not already included in the kernel. Drivers are available for download from the Neousys driver package link, and a WDT_DIO driver package (v2.3.2.0 or later) is required to use Watchdog Timer functions.
The system supports optional wall-mount brackets or an optional DIN-rail mounting kit. Dimensions are 212 mm (W) x 165 mm (D) x 80 mm (H) and weight is 2.5 kg.
The Nuvo-9505D adds an isolated 4-channel digital input and 4-channel digital output (DIO) function via a DB15 connector on the rear panel, which the standard Nuvo-9501 does not have. The Nuvo-9505D also uses the Intel I226-IT Ethernet controller (versus I226-V on the Nuvo-9501) and has a wider operating temperature range of -25°C to 60°C compared to -10°C to 60°C on the Nuvo-9501.
Yes. The system supports Wake-on-LAN (WOL) via its Intel I226 Ethernet port, which can be enabled in BIOS under [Power] > [Wake on LAN] and configured in Windows adapter power management settings. It also has an "Always On" feature: shorting the V+ and Remote On/Off pins on the 3-pin terminal block causes the system to automatically reboot within 5 seconds if it enters a shutdown (S5) state.
How-to Guides
- Power off the system, disconnect all cables, and turn the system upside down.
- Remove the four (4) screws at the bottom of the system.
- Gently lift and remove the bottom panel to access the internal expansion slots.
- Locate the M.2 2280 slot on the motherboard.
- Insert the module at a 45 degree angle.
- Gently press down and secure the module with an M3 P-head screw.
- Before reinstalling the enclosure, remove the protective film on the thermal pad (located on the hard drive bracket) so it can make contact with the M.2 2280 module.
- Reinstall the system enclosure and panel.
- Power off the system, disconnect all cables, and turn the system upside down.
- Remove the four (4) screws at the bottom of the system.
- Gently lift and remove the bottom panel to access the memory slot.
- Locate the SO-DIMM memory module slot on the motherboard.
- Insert the gold fingers of the module into the slot at a 45 degree angle, then push down on the edge of the module until the side clips secure it into position.
- Before reinstalling the enclosure, ensure the protective film on the thermal pad (located on the hard drive bracket) has been removed so it can make contact with the DRAM module.
- Reinstall the system enclosure and panel.
The system accepts 8 to 35V DC via a 3-pin pluggable terminal block, which also provides remote on/off control.
- Identify the three pins: Remote on/off, GND (negative polarity), and V+ (positive polarity).
- Connect your DC power source's negative lead to GND and positive lead to V+.
- Optionally, connect an external non-latched switch to the Remote on/off and V+ pins to enable remote power control; the polarity for the switch connection is negligible.
- To enable "Always On" behavior, short the V+ and Remote on/off pins together so the system automatically powers back on if it enters a shutdown (S5) state.
- Fix the wall-mount brackets to the system enclosure using M4 screws.
- Place the system on a flat wall surface and secure it with four (4) M4 screws.
- Orient the heatsink fins perpendicular to the ground for better heat dissipation efficiency.
- Press F2 when the system boots up to enter the BIOS setup utility.
- Go to
[Advanced]>[Peripheral Configuration]. - Set the
[Set COM1 Mode as]option to the desired mode (RS-232, RS-422, or RS-485). - Press F10 to save the setting and exit.
| Manufacturer | Neousys |
|---|---|
| Short Description | Nuvo-9501 is a cost-effective, compact, fanless embedded computer based on the Intel 14th/13th/12th-Gen platform. Built on the advanced Intel 7 process, Intel 13th-Gen processors offer up to 24 cores/32 threads to deliver up to 2x the performance compared to previous Intel 10th or 11th-Gen platforms. |