
While Windows remains the dominant operating system (OS) for most PC-based tasks, Linux has established itself as a superior operating system for applications that require the highest reliability, security, and performance, such as defense, security, robotics, and automotive systems. Once viewed as an intimidating option offering little to no compatibility with mainstream software applications, Linux has evolved dramatically over the years to be more user friendly. It also now offers support for a growing number of application types, including web browsers, office products, image and video editors, and products for software development/code editing.
Few businesses rely entirely on Linux, however. Most companies that do use it configure a dual-boot — they install Windows and Linux on the same PC, providing users with the option to select which OS they want to use on boot up. Dual-boot is a practical alternative to having separate and dedicated PCs for each OS, particularly when these tasks are not done concurrently. But what about people who are on the move and need to maintain a secure environment and can’t take their PC hardware with them? Similarly, there are those who work with multiple Windows PCs across multiple physical locations who may only occasionally need Linux. In these situations, a dual-boot setup works but isn’t practical.
Fortunately, the complete Linux OS can be installed on a USB drive that you can plug into your PC to use when needed. The USB drive eliminates the need for dual-boot configurations on hardware where a permanent Linux install isn’t necessary and allows you to keep any customized setup and files contained to the USB drive without impacting the file system of the PC you are connected to. If you’re intrigued by this and interested in exploring it further, read on for step-by-step instructions on how to make your own portable Linux OS.
Installing Linux on a USB Drive
What You’ll Need:
1. A Windows 11 PC with two available USB 3.0 ports.
2. Two (2) USB 3.0 drives or memory sticks that are each at least 32 GB. Because memory has a limited number of read/write cycles, we recommend using new drives for maximum longevity although used ones will still work.
3. Linux Ubuntu 22.04 LTS ISO file. Download the Ubuntu ISO file.
4. Rufus bootable drive creator. Download the Windows installation file for Rufus.
5. An EFI system partition manager such as EasyUEFI. Download EasyUEFI.
Note: USB 3.0 hardware is strongly recommended. While USB 2.0 will work, read and write times will be considerably slower and negatively impact the installation and setup process as well as the overall performance of the Linux OS.
Create a Bootable Ubuntu USB Installation Drive
Once you’ve downloaded the three required pieces of software, create a Bootable Ubuntu USB drive. You’ll use this to install Ubuntu on the second USB drive. Going forward, the Bootable Ubuntu USB Drive will be referred to as USB Drive 1.
1. Connect a USB drive to your computer and launch the Rufus application.
Note: This process will erase all content on your USB drive. If you are not using a new USB drive, make sure to backup any content on the drive before proceeding.
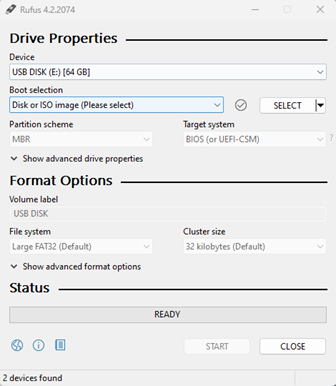
2. From the Device drop-down, select the USB drive that you plan to use.
3. From the Boot Selection drop-down, select Disk or ISO image. Click Select.
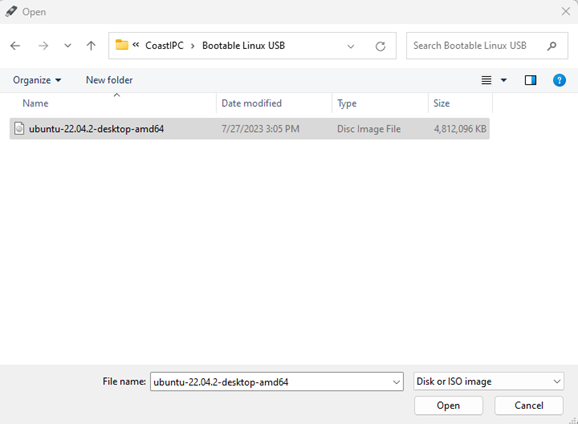
4. Navigate to the location where you saved the Ubuntu 22.04 LTS ISO file. Select it and click Open.
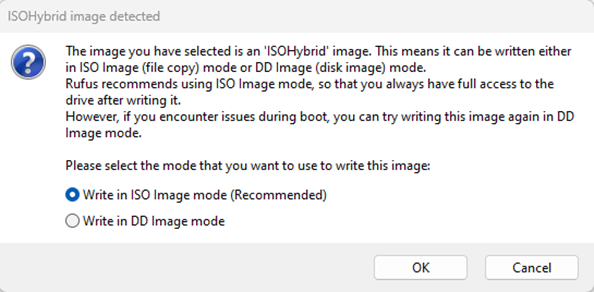
5. Click the Start button at the bottom of the Rufus application. You’ll be presented with the notification “ISOHybrid image detected.” Leave the mode at the recommended setting and click OK.
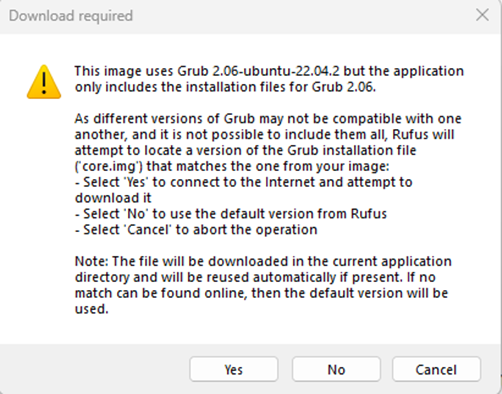
Note: If you are given the prompt “Download required,” click Yes.
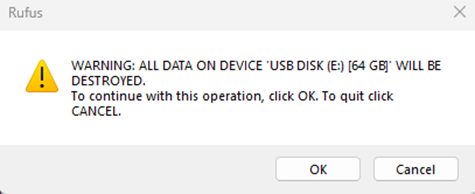
6. Accept the final warning to erase the contents of your USB drive and start the programming process.
7. When the process is complete, close the Rufus application.
Installing Ubuntu 22.02 LTS on a USB Drive
In this second part of the process, you will use USB Drive 1 to create a portable Linux installation. Going forward the portable Linux installation will be referred to as USB Drive 2.
1. Keep USB Drive 1 in your computer’s USB port.
2. Restart your computer and rapidly press the key that enables the Startup menu. On many systems, pressing the Esc key rapidly and continuously as soon as you power on will work. However, different manufacturers have different methods (F2, F10, or F12 for example) for accessing the Startup menu. Most computers will display a brief message on screen at the very start of the boot process indicating which key to use. If you miss the message or are not quick enough with the key, simply reboot and try again.
3. From the Startup menu, choose to access the Boot Menu and then choose your USB Drive 1 and press Enter.
4. Install USB Drive 2 in another available USB port.
5. When the GRUB menu appears, select Try or Install Ubuntu and press Enter.
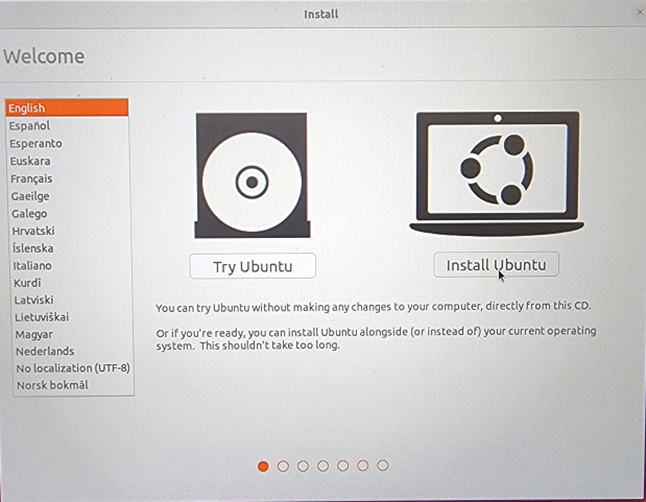
6. Once Ubuntu starts, select Install Ubuntu.
7. Choose your keyboard layout and language and click Continue.
8. Optionally, you can connect to an available wireless network by selecting it and entering the appropriate password or simply choose “I don’t want to connect to a Wi-Fi network right now” and click Continue.
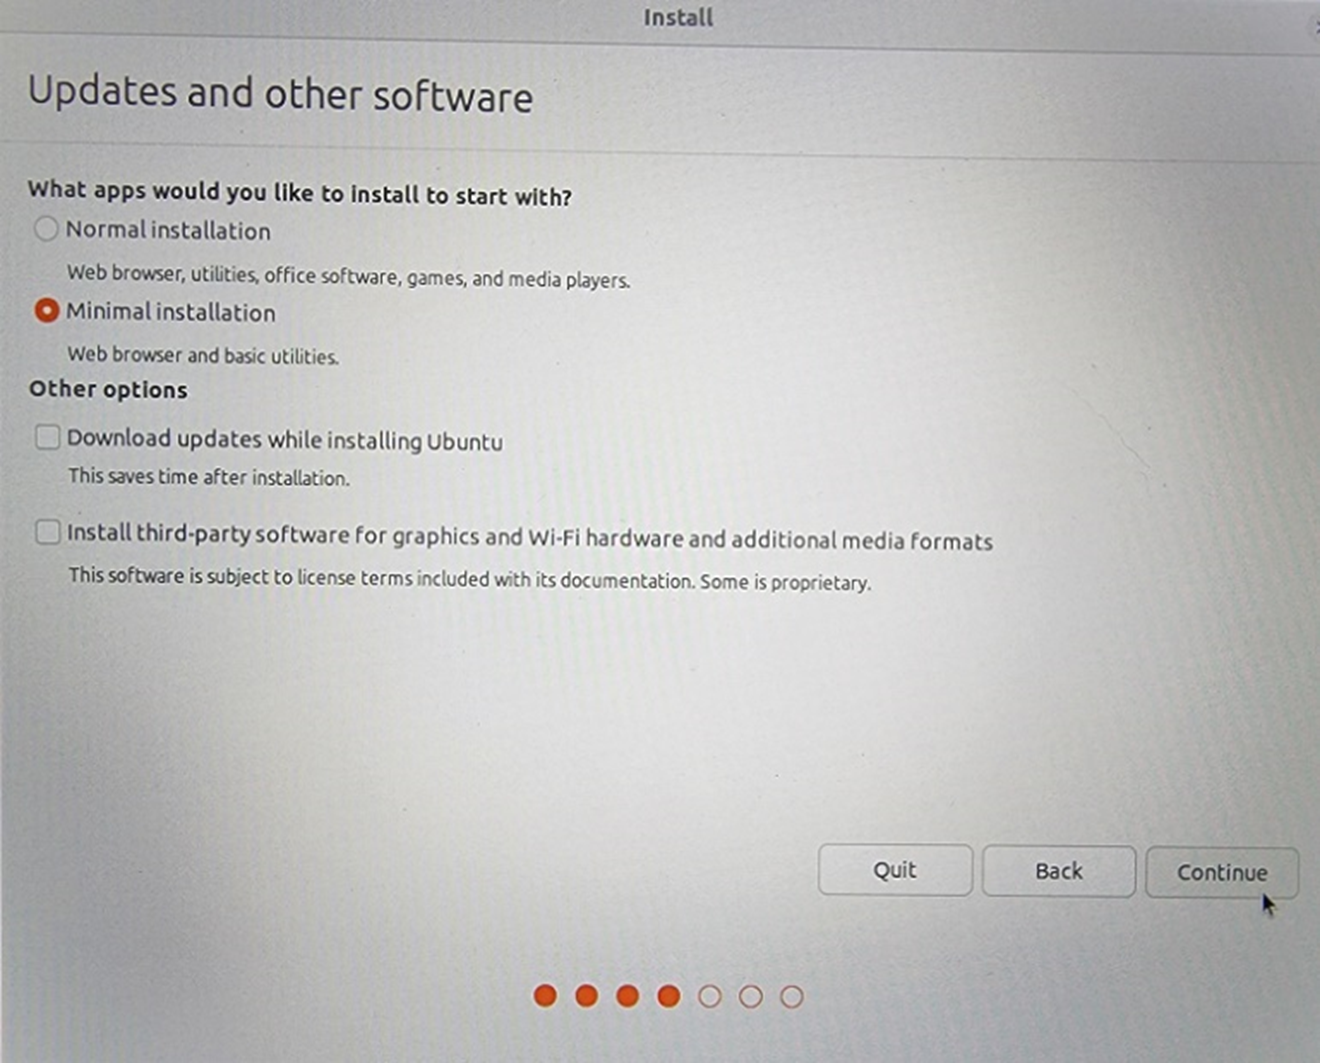
9. Choose Minimal installation and uncheck both boxes in the Other options section. Click Continue.
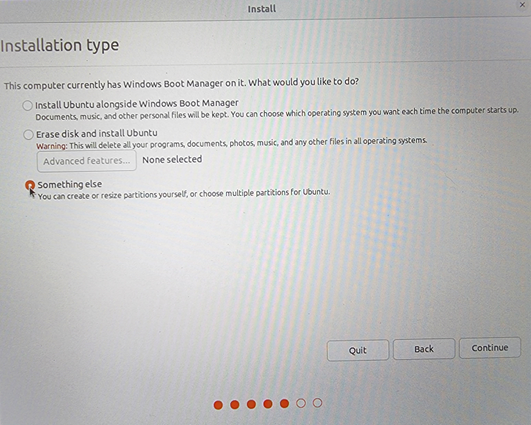
10. At the Installation Type screen, select Something Else and click Continue.
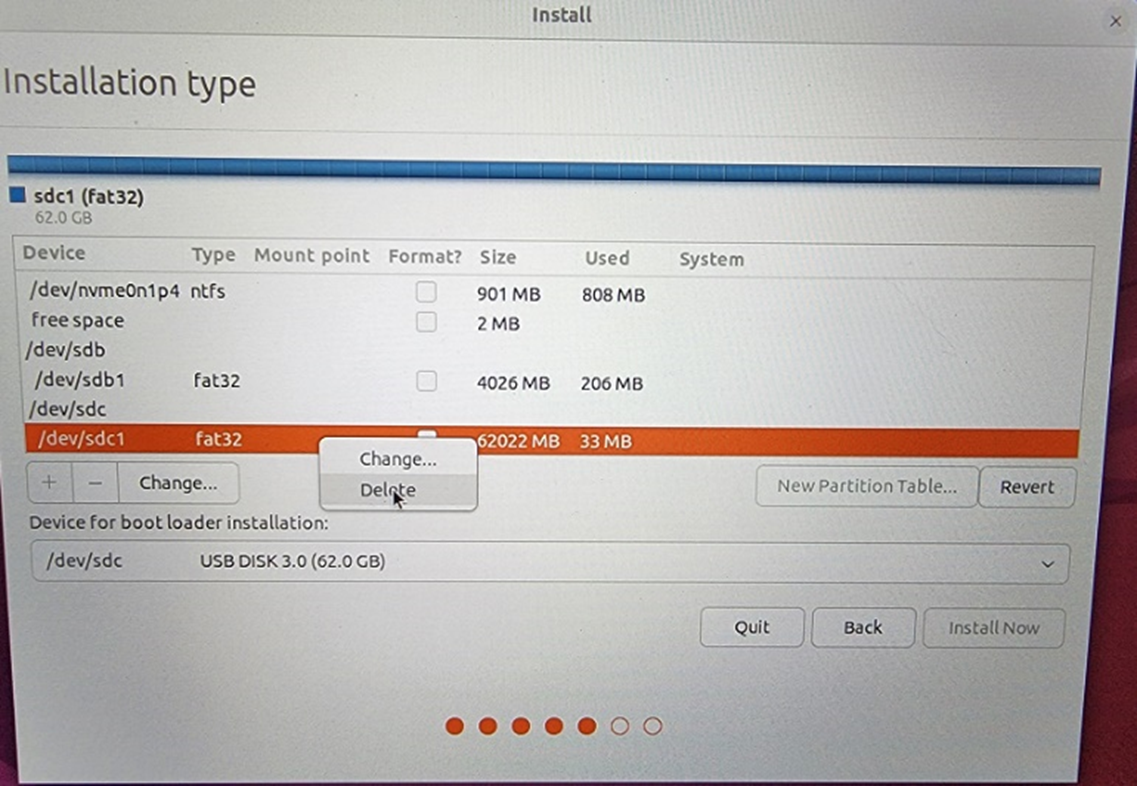
11. Next, specify the installation location as well as set up the partition structure on USB Drive 2. Navigate down the list of available drives until you find the USB you are using for USB Drive 2 and open the drive. If there are any existing partitions on this drive, right-click on each of them and choose Delete.
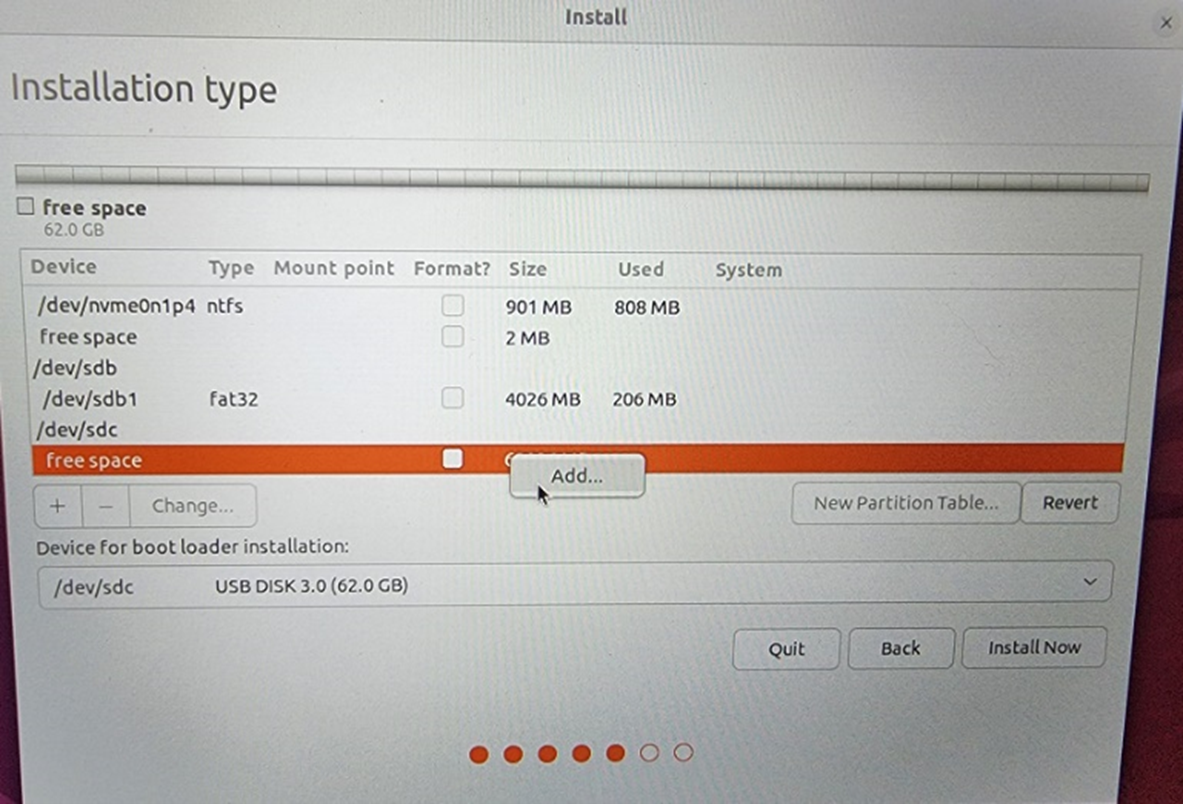
12. Once you’ve removed the partitions, right-click on free space and left-click Add.
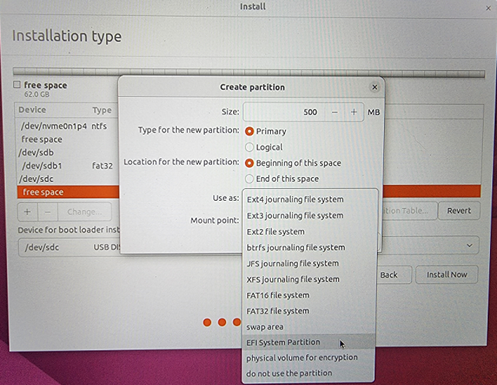
13. Set the size to 500 MB and leave the type and location values unchanged. From the Use as drop-down, select EFI System Partition and click Ok.
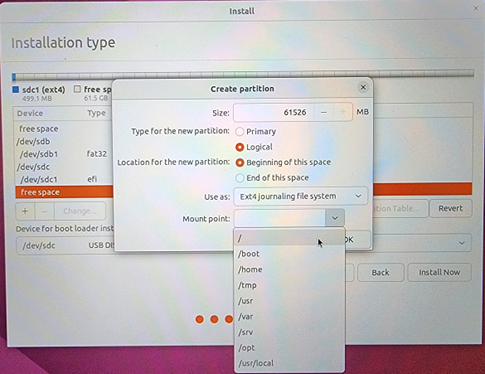
14. When the partition is created, it will appear under Device. Right-click on free space and choose Add once again. This time, leave the size, type, and location values unchanged and set the Use as section to Ext4 journaling file system. Set the Mount point to / and click Ok.

15. Set the Device for boot loader installation drop-down to your USB Drive 2 and click Install Now. Even though we specified the USB Drive for the boot loader during installation, modern motherboards that make use of UEFI only support one ESP partition and the EFI files for your Linux installation will end up on the same partition as your Windows OS.
16. You’ll be presented with a warning that your changes will be written to disk and that the existing data on your device will be destroyed. Click Continue.
17. As some final housekeeping, set your geographic location and click Continue.
18. The final screen for this section will require you to enter your name, specify a computer name and username, and set a login password for your Linux installation. Go ahead and create those but make sure you set a password that you’ll remember! Click Continue when finished.
The file copy and installation process may take an hour or more to complete. It shouldn’t require any user involvement until it finishes. When completed, you’ll be prompted to restart your computer, which you can do. When your system boots back up, you’ll boot into Ubuntu where you will wrap up the process by completing a few final steps.
Copying EFI Files and Cleaning Up
1. Once your system has booted to Ubuntu, log in with the username and password that you specified during the installation.
2. Because you’re running from a USB drive, the boot-up process may seem a little slow but once it finishes, make sure you have both USB Drive 1 and USB Drive 2 plugged in, and click the Super key (this is the Windows key on a Windows keyboard). Type Disks in the search window that appears and open the Disks utility.
3. Select USB Drive 1 (your Bootable USB drive, which you can identify it by its single partition), click Play to mount it, and click the Mounted at location next to Contents. When the window opens, Copy the EFI folder.
4. Return to the Disks utility and select USB Drive 2 (your Ubuntu installation). Click the Filesystem partition (which will be about 500 MB in size) and mount it by clicking Play.
5. Click the Mounted at location next to Contents. When the window opens, the partition should be empty. Right-click anywhere in the window and Paste the EFI folder that you copied in the last step.
6. Shut down your computer (pressing the power button should give you a shutdown option). When the computer shuts down, unplug USB Drive 1 but leave USB Drive 2 plugged in.
7. Power on the PC and enter the Boot Menu as you did at the beginning of the Installing Ubuntu 22.02 LTS on a USB Drive section.
8. You’ll notice that Ubuntu is at the top of the boot list. Choose Windows Boot Manager and boot into Windows.
9. Log into Windows and install the EasyUEFI application that you downloaded earlier. To do this, simply navigate to where you saved the EasyUEFI software download, double-click it, and follow the instructions. After the installation completes, launch the utility and choose Manage EFI Boot Option.

10. Select Windows Boot Manager and click the Up arrow to bring it to the top of the Boot Order list. Click Home.
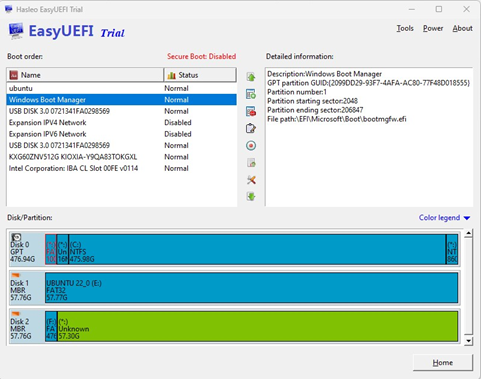
11. Select Ubuntu in the list and click Delete to remove it from the Boot Menu on the local hard drive. We don’t want this here as Ubuntu does not reside on the local hard drive.
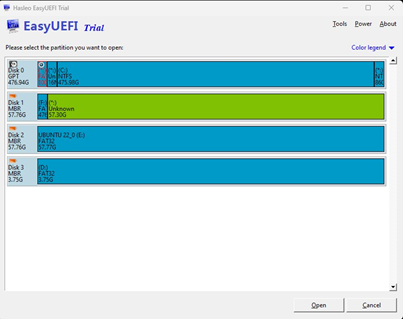
12. Click the Manage EFI System Partition button followed by the EFI System Partition Explorer button.
Note: Follow the next instructions carefully. Changes made using the EasyUEFI utility are often irreversible and can significantly affect your computer’s ability to boot and function.
13. Click the EFI partition of your main hard drive (the first small block on the left) and click Open.
14. Expand the EFI folder (click the Plus sign to the left of the folder) followed by the Ubuntu folder. Right-click the grub.cfg file and click Download.

15. Expand the drive letter for USB Drive 2 followed by the EFI folder. Select the boot folder and click OK.
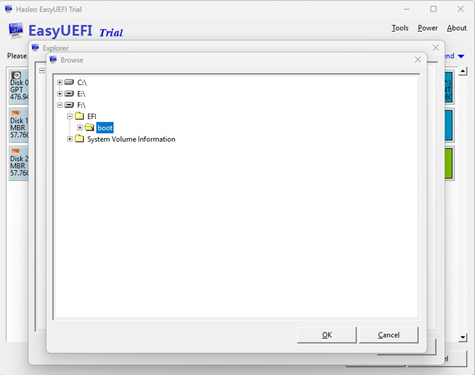
16. Right-click the shimx64.efi file, choose Download, and place the file into the boot folder as well. Click Exit when finished and close the EasyUEFI application.
Conclusion
Congratulations! At this point, your USB installation of Ubuntu should be functional. Boot to it directly by restarting your computer, entering the Boot Menu, and choosing your USB drive as the boot option. Once you’ve confirmed that everything works, you can optionally use the EasyUEFI utility to delete the Ubuntu directory from the main hard drive EFI partition (see steps 12 and 13). Make sure that you only delete the Ubuntu directory and nothing else.
The overall performance of running Ubuntu from a USB drive varies, but it will be sufficient to perform basic tasks. Additionally, anything that you do in Ubuntu should be written back to the USB drive. Your customization and other work are all contained on USB Drive 2 and not on the PC’s main hard drive. This provides a portable, secure Linux distribution that doesn’t impact the existing computer or its file system.