For many years, Linux operating systems have offered flexibility in minimizing disk space use, hardware compatibility, and portability. The ability to create a portable instance of a Linux OS on a USB stick isn’t new and has enabled people to experiment with the operating system without impacting whichever operating system is installed on the PC’s primary hard drive. They also allow users to take their files and programs, and work with them when moving between shared computers.
As Windows advances, it is closing the gap on some of the unique attractiveness that Linux offers. Thanks, in part, to third-party tools and utilities, we can now create portable versions of the Windows operating system that can boot and run from a USB drive or other portable flash media.
Creating a “Windows to Go” version of Windows 11 can be completed relatively easily and without advanced knowledge of the Windows installation process. The resulting portable operating system eliminates the need for dual-boot configurations and includes all the standard applications and functionality you’d expect. If you’re intrigued by this and want to explore it more, read on for step-by-step instructions on how to make your portable version of Windows 11.
Installing Windows 11 on a USB Drive
What You’ll Need:
- A Windows 11 PC with an available USB 3.0 port.
- A USB 3.0 hard drive or solid-state drive that is at least 64 GB. Because memory has a limited number of read/write cycles, we recommend using new drives for maximum longevity, although used ones will still work.
- Rufus bootable drive creator. Download the Windows installation file for Rufus. Download the Windows installation file for Rufus.
Note: USB 2.0 hardware is not recommended for this. While it may technically work, read/write times will be significantly impacted and may make using the OS nearly impossible. USB 3.0 hardware is strongly recommended.
Note: Portable USB thumb drives are not recommended for this. Despite offering USB 3.0 compatibility and higher transfer speeds than USB 2.0 devices, many lack cache memory and sustained performance, resulting in long boot times and degraded operational performance.
Create your Bootable USB Drive
Once you’ve downloaded the Rufus application, launch it, connect your USB drive to an available USB 3.0 port, select the USB drive from the Device drop-down, and set the Boot Selection to Disk or ISO image. (Figure 1).
Note: If you are using an external USB hard drive, it may not appear in the Device drop-down. To resolve this, click Show Advanced Drive Properties and enable List USB Hard Drives
Figure 1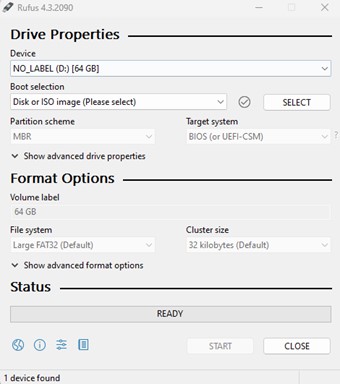
Click the down arrow next to Select and click Download.
Choose Windows 11 from the Download ISO Image window and click Continue (Figure 2).
Figure 2
Select the most recent release from the Release drop-down that appears and click Continue.
Select Windows 11 Home/Pro/Edu from the Edition drop-down that appears and click Continue.
Select your preferred language from the Language drop-down that appears and click Continue.
Select your preferred architecture from the Architecture drop-down that appears and click Continue. Depending on your hardware, you may only see x64 as an option.
When finished, the Download ISO Image window should look like Figure 3 below. Click Download and choose where to save the ISO image. The download process will take some time to complete.
Figure 3
When the download is complete, click on the Image Option drop-down and select Windows to Go. This will target the Windows 11 installation to your USB drive. Make a final check that you have selected your USB 3.0 drive from the Device drop-down and click Start (Figure 4).
Figure 4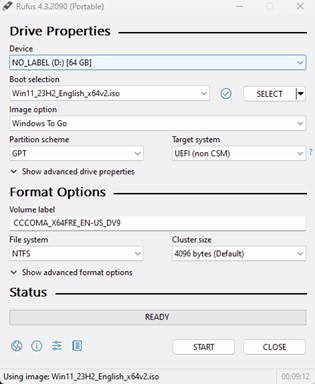
Select the version of Windows that you wish to install when prompted (Figure 5).
Figure 5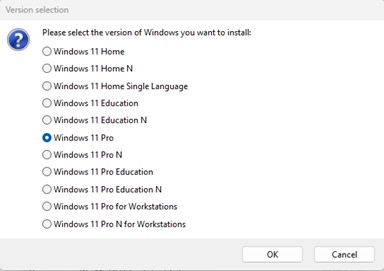
Select your desired user experience options from the Windows User Experience window that opens and click OK (Figure 6).
Figure 6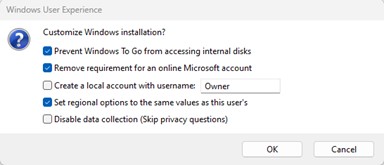
Rufus will prompt you with a final warning that all data on the device you selected will be destroyed. Once again verify that you are targeting the correct USB 3.0 drive and click Ok (Figure 7).
Wait for the installation process to complete.
Figure 7
The installation process will take some time to complete. Make sure to disable any power-saving features that may cause your PC to enter sleep mode if left unattended, as this can disrupt the process and cause you to start again.
- Once the process has finished, close the Rufus application and disconnect the USB drive from your computer.
- Connect the drive to the computer that you want to run Windows 11 and boot that PC.
- Rapidly press the key that enables the Startup menu. On many systems, pressing the Esc key rapidly and continuously as soon as you power on will work. However, different manufacturers have different methods (F2, F10, or F12, for example) for accessing the Startup menu. Most computers will display a brief message on screen at the very start of the boot process indicating which key to use. If you miss the message or are not quick enough with the key, simply reboot and try again.
- From the Startup menu, choose to access the Boot Menu and then choose your USB Drive and press Enter.
- The first time booting your OS to a new PC will take a few minutes. At the end of the boot process, you will be prompted to connect to the Internet. If you connect to a network, you will need to verify your Microsoft account each time you connect your drive to a different PC. Skipping the option to connect to the Internet will avoid Microsoft account verification but will limit access to some functionality.
- Once you’ve decided whether to connect to the Internet, you’ll arrive at the Windows login screen.
Conclusion
Congratulations! You’re now running your Windows OS from a portable drive, independent of the PC you are physically using.
The overall performance of running Windows from a USB drive will vary but will be sufficient to perform basic tasks. Additionally, any files you create or items you save while running in this mode should be written back to the USB drive and will be taken with you when you go.